Quick Answer: You can connect taps to Google Sheets without coding using Google Forms (free, instant), IMPORTRANGE (for syncing tabs), AppSheet (mobile apps), Zapier/Make (automation), or API Connector add-ons. Choose Forms for simple data capture, Zapier for external triggers, and AppSheet for offline mobile workflows.
Have you ever wished you could get real-world data—like when someone checks in, scans a product, or taps a button—straight into a spreadsheet? Maybe you needed to log shop-floor taps into a single Google Sheets file but didn’t know where to start.
The great news is that you don’t need to be a programmer. This comprehensive guide shows you step-by-step methods to seamlessly tap google sheets with data from forms, other spreadsheets, and even mobile devices. We will cover everything you need to know about how to connect taps to Google Sheets without coding.
How to Connect Taps to Google Sheets Without Coding: Methods at a Glance
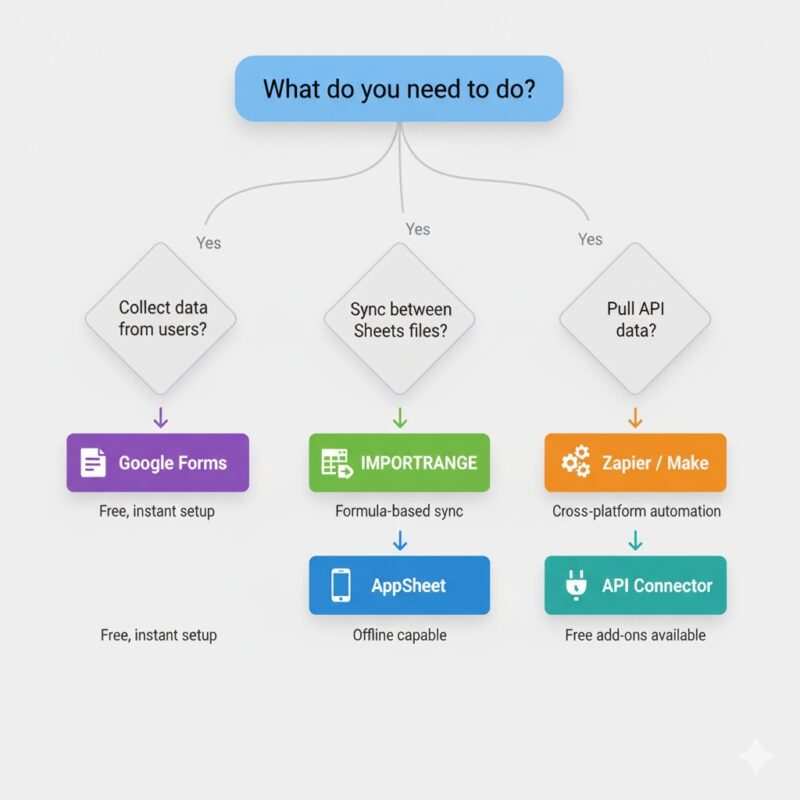
Here are the fastest, easiest ways to get your data into a spreadsheet without writing formulas or scripts.
- Tap to Google Sheets via Google Forms (No Code, Free): Create a Google Form, link its Google Forms responses to a Sheet, and every time the form is submitted, a new row is instantly added. This is the simplest way to get data into a Sheet.
- Connect tabs in Google Sheets (Formulas, Free): Use the
=IMPORTRANGEformula to pull live data from one spreadsheet file into another, keeping them in sync. - AppSheet (No Code Mobile App): Generate a powerful, no-code mobile app directly from your existing Sheet. This lets users capture detailed field data, scan barcodes, and sync it back to the rows, even offline.
- Zapier & Alternatives (Automation): Use automation services like Zapier, Make, or IFTTT to create a connection that monitors a trigger (like a webhook from an NFC tap) and automatically creates a new row in your Sheet.
- TAP NFC Management (Mobile App): Use a dedicated mobile app like TAP NFC Management to record a tap and connect that event to your Sheet using an automation tool.
- API Connector (Advanced No Code): Install a Sheets add-on like Mixed Analytics to pull data from external services that use a web address (an API endpoint) without needing to code the connection yourself.
- Google Apps Script (Low-Code Power): For ultimate control, a few lines of Google Apps Script can create custom functions and triggers to automate virtually any task within Sheets.
How to connect tabs in Google Sheets?
Sometimes, the “tap” you need to connect is just data living in a different sheet or tab. Using Google Sheets formulas within Google Sheets itself is the most reliable and fastest way to keep internal data synced. It’s often best practice to keep related information in separate spreadsheet tabs or even separate files.
How do I link tabs in a spreadsheet?
You can link data in two main ways: inside the same file (same-file references) and across different files (cross-file references).
1. Linking Within the Same Spreadsheet File
To pull data from one tab to another within the same file, you use a simple formula to create internal links: =SheetName!A1.
For example, if you want cell B2 in your Report tab to always show the total number from cell F10 in your Calculations tab, you would type: =Calculations!F10
Pro Tip: If your sheet name has spaces, you must enclose it in single quotes: ='Raw Data'!F10. You can also use the dollar sign ($) for absolute references. For example, Calculations!$F$10 means the reference will never change, even if you copy the formula. This is crucial for creating dashboards.
2. Linking Across Different Spreadsheet Files with IMPORTRANGE
To sync data between two completely separate Google Sheet files, you must use the powerful IMPORTRANGE formula. For more details, you can refer to Google’s official documentation on the IMPORTRANGE function.
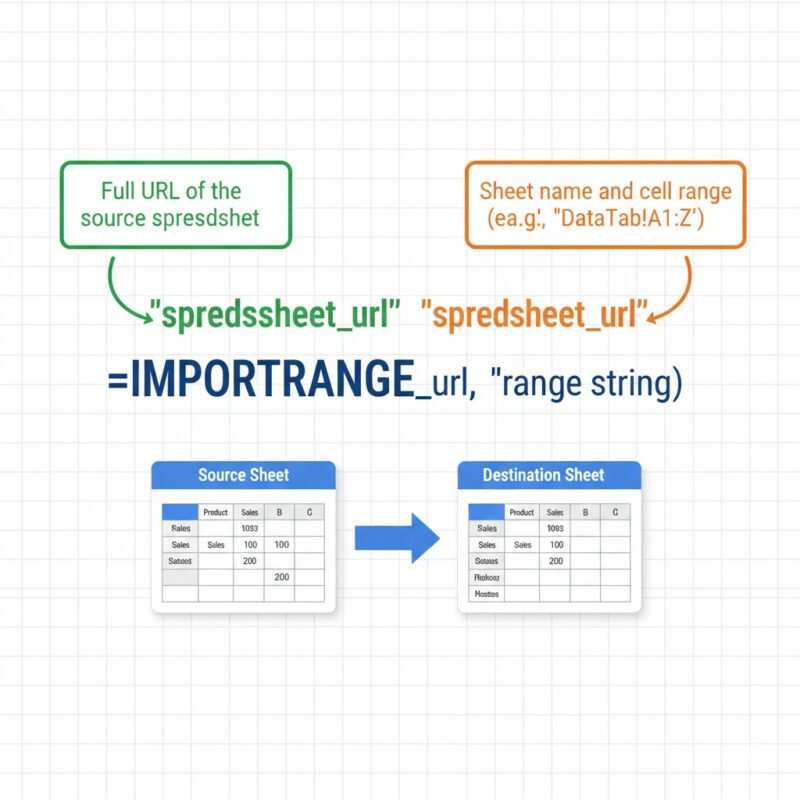
The formula looks like this: =IMPORTRANGE("spreadsheet_url", "range_string")
Step-by-Step IMPORTRANGE Use:
- Find the URL: Copy the full web address (URL) of the source spreadsheet.
- Define the Range: Choose the exact sheet and cells you want to import, like
"Orders!A1:Z". - Combine: Put them together in your destination sheet:
=IMPORTRANGE("https://docs.google.com/spreadsheets/d/1B0qR-...", "DataTab!A1:Z") - Allow Access: The first time, the cell will show a
#REF!error. You must click the “Allow access” button to permit the connection.
Pitfalls and Fixes for IMPORTRANGE:
| Symptom | Likely Cause | Fix |
|---|---|---|
| #REF! error | You haven’t granted permission yet. | Click “Allow access” on the error message. |
| Data is outdated | The source sheet hasn’t recalculated. | Wait up to 5 minutes, or try a minor edit in the source sheet to force an update. |
| Missing data | Sheet names or ranges are wrong. | Check the range_string (e.g., DataTab vs. 'Data Tab 1'). |
How to sync data between tabs in Google Sheets?
The best way to fully achieve a data sync and control your imported data is by combining IMPORTRANGE with other functions like FILTER or QUERY.
- Master Tab Pattern: Use
IMPORTRANGEto pull all raw data from multiple sources into one “Master” tab. - Summary Tab Pattern: Use
QUERYon that master tab to clean, filter, and summarize the information. For example:=QUERY(IMPORTRANGE("sheet_url","Tab!A:D"), "SELECT * WHERE Col4 = 'Complete'", 1)
This ensures your data sync is not just a copy, but a filtered, useful view of the live source data.
Linking sheets is perfect for organizing data you already have. But what if you need to capture new information from users in the real world? For that, the simplest tool in the Google ecosystem is Google Forms.
How to connect GForm to sheets?
One of the easiest ways to get data into a spreadsheet is by linking a Google Form directly to it. Google Forms is designed to collect data (the “tap” event) and automatically drop it into a Sheet row-by-row.
Step-by-Step: Linking a Google Form to a Spreadsheet
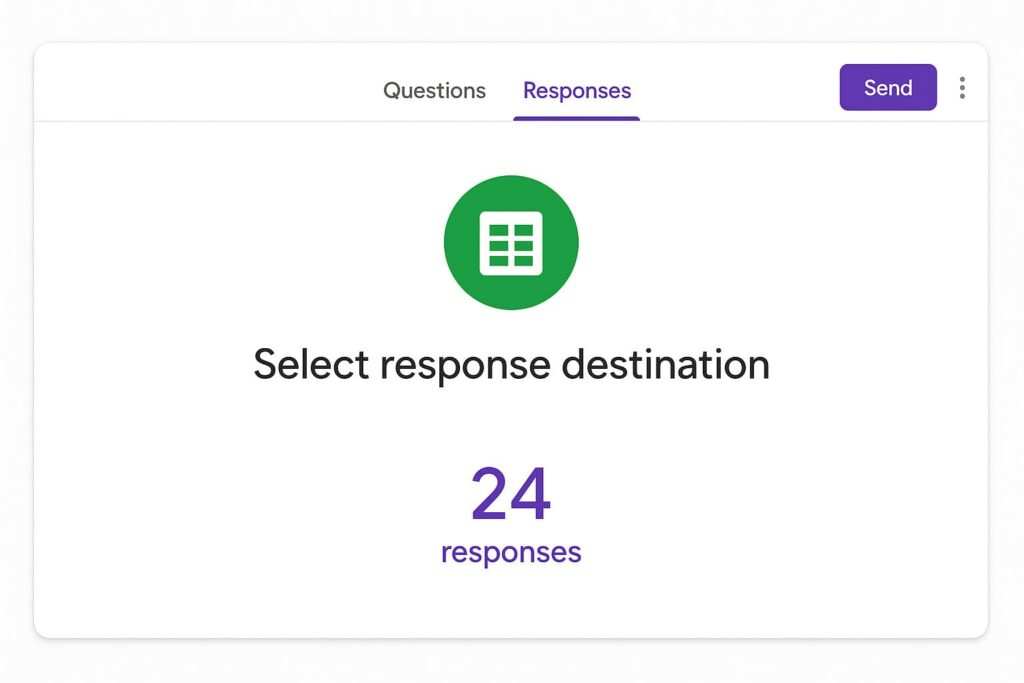
- Open Your Form: Go to your Google Form.
- Go to Responses: Click the Responses tab.
- Find the Sheets Icon: Click the green Sheets icon.
- Set Destination: Choose to Create a new spreadsheet or Select existing spreadsheet as your spreadsheet destination.
- Confirm: Click Create or Select.
From now on, every form submission adds a new row in real-time to a tab named “Form Responses 1”.
Best Practices for Form-Linked Sheets
- Don’t Edit the Destination Sheet Directly: Avoid manually editing the “Form Responses” tab. Doing so can break the connection.
- Analyze Data in a Separate Tab: Create a new tab. Use formulas like
=QUERY('Form Responses 1'!A:Z, "SELECT ...")to pull data from the response tab into your analysis tab. This keeps the raw data pristine.
Turn a “Tap” into Data with QR Codes
A fantastic way to make your form accessible is with a QR code. Users can scan the code with their phone camera to instantly open the form. While you’re deciding on a method, it can be useful to understand the differences between NFC vs. QR business cards to see which technology best fits your needs.
- In your live Google Form, click the Send button.
- Go to the link tab (the chain icon).
- Click Shorten URL.
- Copy this shortened URL and paste it into any free online QR code generator.
- Print the QR code and place it where needed—on equipment for maintenance logs, at event entrances for check-ins, or on product packaging for feedback.
Add your Logo to the Google Form
Adding your company’s logo to your Google Form is a key step in building user trust. Go to the paint palette icon (Customize Theme) in the top right corner of your form to select a header image with your logo.
Important Note for AdSense Compliance: When adding branding, ensure your design doesn’t mimic Google’s, which could imply an official endorsement.
Google Forms is incredibly simple, but it’s not a full-fledged app. If you need more advanced data capture features like barcode scanning and offline capabilities, it’s time to level up with AppSheet.
AppSheet: capture taps and sync to Google Sheets (no code)
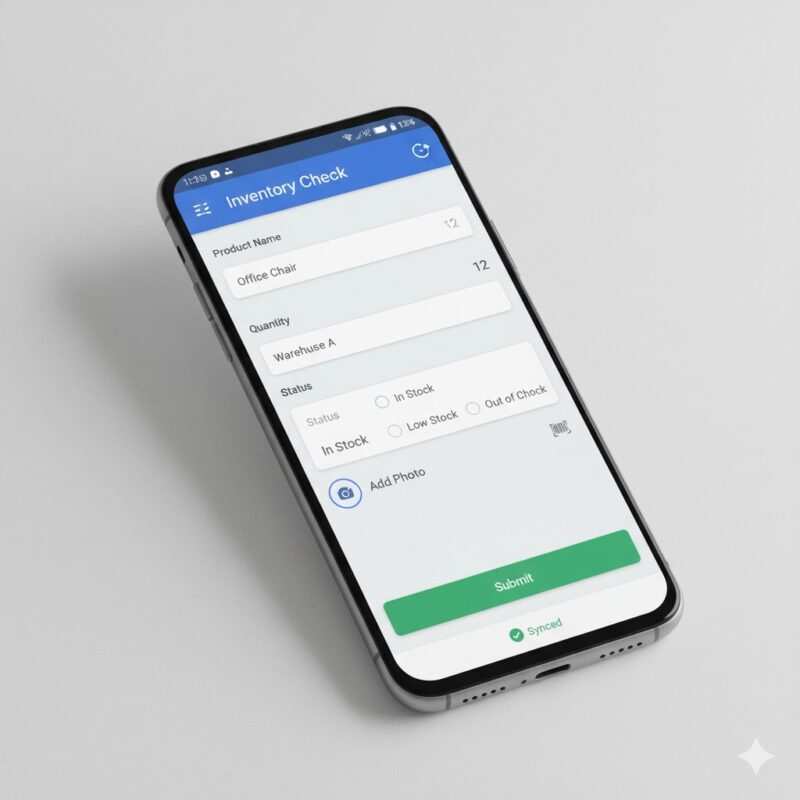
AppSheet is a powerful Google-owned tool that builds sophisticated no-code mobile apps using your Google Sheets file as the data source. It’s fantastic for field workers, inventory tracking, or simple tap-to-log processes. You can learn more from the official AppSheet support page.
How AppSheet Works:
- Generate an App: From your Google Sheets file, go to Extensions → AppSheet → Create app.
- Sheet as Data Source: AppSheet analyzes your column headers and instantly generates a working app interface.
- Capture and Sync: User actions in the app are written directly back into the rows of your Sheet. It even handles offline data capture and syncs when the user is back online.
Common Use-Cases for AppSheet
- Inventory Management: Scan barcodes with a phone’s camera to check items in or out.
- Field Inspections: Create safety checklists or site inspection forms that include photo uploads and GPS location stamps.
- Project Management: Update task statuses and log hours from a mobile device.
AppSheet is great for complex capture, like taking photos or scanning barcodes, which can act as your “tap” event.
Note: AppSheet doesn’t include built-in NFC tag reading. For NFC-based logging, pair it with iOS Shortcuts or Android NFC apps that trigger webhooks.
AppSheet is the ultimate tool for creating a data capture interface for your sheet. But what if the “tap” event happens in a completely different app or service? To bridge that gap, you need an automation platform like Zapier.
Zapier: send tap events to Google Sheets (no code)
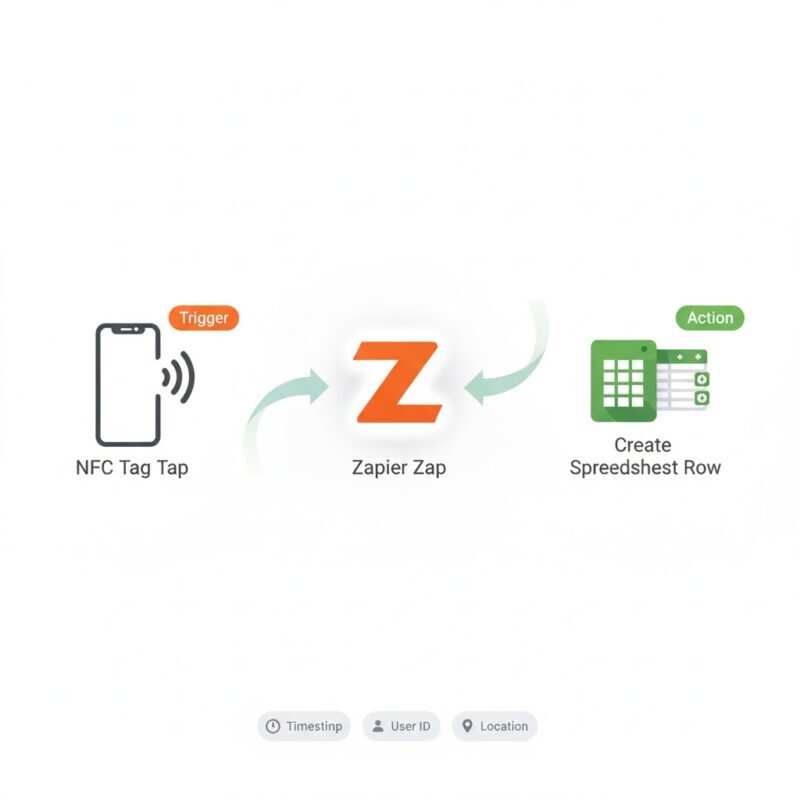
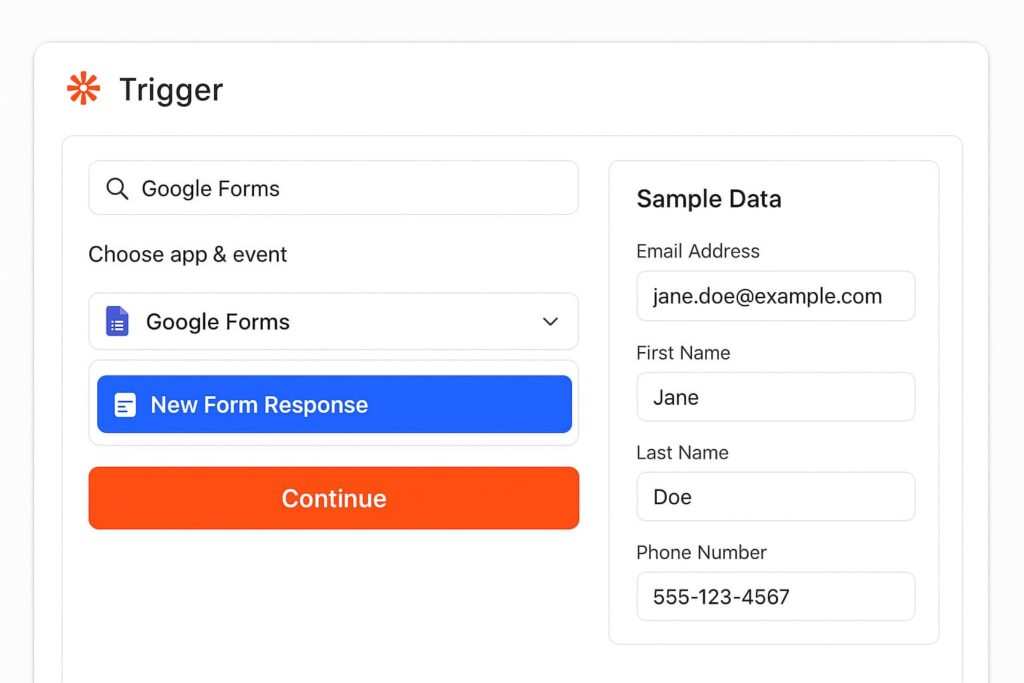
If your “tap” comes from an external app, a website, or a simple phone automation, Zapier is the perfect middleman. Zapier creates “Zaps” (connections) that say, “When this happens in App A (the trigger), do this in App B (the action).”
For this guide, the action is always: Google Sheets action “Create Spreadsheet Row.”
Setting Up the Zapier Action
Before building the Zap, make sure your target sheet is ready.
- Headers in Row 1: Your column titles must be in the very first row.
- No Blank Headers: Every column header must have a name.
- Clean Data Block: Avoid leaving blank rows in the middle of your data set.
Where does the “tap” come from?
The trigger for the Zapier connection can come from almost anywhere, including your phone’s built-in tap features.
iOS Shortcuts App:
- Open the iOS Shortcuts app and create a new Automation triggered by an NFC tag tap. If you run into issues, you may need to learn how to fix an iPhone not reading NFC.
- Set the action to “Get Contents of URL” using a custom webhook address that Zapier provides.
- When you tap the NFC tag, the automation runs, sends the webhook, and Zapier adds a row to your Sheet.
Android NFC Apps:
- Use an Android NFC app like NFC Tools to write a custom webhook URL from Zapier directly to the NFC tag.
- When a phone with Android NFC reads the tag, it opens the URL, triggering the Zap. If your phone says it couldn’t read the tag, you may need to troubleshoot the tag or your device settings.
A Note on Cost: Be aware that using Webhooks as a trigger often requires a paid plan from automation services like Zapier.
Zapier is a household name in automation, but it’s not the only option. Exploring alternatives can often save you money and provide more flexibility, especially if your needs are complex.
Beyond Zapier: Exploring Other Automation Tools
While Zapier is popular, other platforms offer powerful features, sometimes with more generous free plans.
Make (Formerly Integromat)
Make is known for its visual interface where you can see how your data flows between modules. It’s fantastic for complex, multi-step automations.
- Generous Free Tier: Make’s free plan often includes more operations per month than Zapier’s, making it a cost-effective choice for higher volume tasks.
- Advanced Logic: It allows for more complex routing and data manipulation without needing code.
IFTTT (If This Then That)
IFTTT is one of the simplest automation tools, perfect for straightforward, one-to-one connections, especially for smart home devices and personal productivity.
- Simplicity: If you just need a simple “if I tap an NFC tag, add a row to my sheet,” IFTTT is often the quickest way to set it up.
- Mobile-Focused: It has strong integrations with mobile device features on both iOS and Android.
Which Method Is Right For You? Forms vs. AppSheet vs. Zapier
| Feature | Google Forms | AppSheet | Zapier / Make |
|---|---|---|---|
| Best For | Simple surveys, check-ins, registrations. | Mobile data capture, inventory, field work. | Connecting external apps, automating workflows. |
| Cost | Free | Free tier, paid plans for advanced features. | Free tier, paid plans for premium apps/volume. |
| Setup Complexity | Very Low | Medium | Low to Medium |
| Offline Capability | No | Yes | No |
| Customization | Low (theming) | High (UI, logic) | Medium (logic) |
| External Integrations | Low (only via scripts) | Medium (via webhooks) | Very High (thousands of apps) |
TAP NFC Management: log a tap to Google Sheets
The TAP NFC Management app for iOS is a specialized solution designed to manage inexpensive NFC tags for tracking events like check-ins or asset management. Understanding NFC tag reading distance and choosing the right chip, like an NTAG213 vs. NTAG215, can be crucial for reliability.
While the app handles the recording of the tap, you need an external automation tool like Zapier or Make to get the data into your Google Sheets file.
The No-Code Flow:
- App Records Tap: Configure a tag using the TAP NFC Management app to log an event.
- Intermediate Automation: While TAP NFC Management records tap events within the app, direct Google Sheets integration is not yet available. For now, use a workaround: export tap logs (if the app supports CSV export) or pair with iOS Shortcuts + webhooks (as described in the Zapier section) to send tap data to your Sheet.
- Sheets Row Created: Once the automation tool sees the new tap, it uses the Google Sheets action “Create Spreadsheet Row” to insert the details into your Sheet.
Automation platforms are perfect for connecting different apps. However, some online services offer data via an “API,” and for that, a dedicated connector add-on is the most direct route.
Is there a free API connector for Google Sheets?
Yes! If your source data comes from a service with an API (Application Programming Interface), you can use an API Connector add-on. An API is just a structured way for computers to share data over the web.
Here are the best options for a free API connector for Google Sheets:
Mixed Analytics API Connector
- Free Plan Highlights: Up to 100 requests per month, 1,000-row limit per request. Ideal for light integrations.
- Limitations to Know: Scheduling data refreshes is usually a paid feature.
Coupler.io
- Free Plan Highlights: Coupler.io offers a limited free plan (often for one connection).
- Limitations to Know: Requires manual refresh to update data.
Apipheny
- Free Plan Highlights: Provides a free plan after a trial period.
- Limitations to Know: The free plan has significant limits on API calls.
These add-ons are great for polling a service and appending new data to your Sheets file without writing Google Sheets formulas or scripts.
While all the methods so far have been “no-code,” sometimes you need a level of customization that these tools can’t offer. For those moments, stepping into the world of “low-code” with Google’s own scripting language opens up a universe of possibilities.
The Ultimate Power Move: Google Apps Script (Low-Code)
For total control and automation inside Google Sheets, nothing beats Google Apps Script. It’s a scripting platform based on JavaScript that lets you create custom functions, menu items, and triggers.
When to Use Google Apps Script:
- You need custom logic that no-code tools can’t handle (e.g., complex data validation).
- You want to build a solution that is 100% free and runs entirely within your Google account.
- You want to trigger an action based on a specific event, like a user editing a cell (
onEdit).
Example: Automatic Timestamps A common use case is to automatically add a timestamp in column B whenever a user enters data in column A.
- In your Sheet, go to Extensions → Apps Script.
- Delete any placeholder code and paste this in:
function onEdit(e) { var sheet = e.source.getActiveSheet(); if (e.range.getColumn() == 1 && e.value) { sheet.getRange(e.range.getRow(), 2).setValue(new Date()); } } - Click the Save project icon. Now, whenever you edit a cell in column A, the current date and time will instantly appear in column B of the same row.
Troubleshooting Flowchart: Why Isn’t My Data Syncing?
Use this guide to diagnose common issues.
Start Here: What method are you using?
- I’m using Google Forms…
- Question: Did you check the Responses tab in your Form to see if the link to the Sheet is still active?
- If No: Go to the Responses tab and click the green Sheets icon to re-link it.
- Question: Did you manually edit, delete, or reorder columns in the “Form Responses” tab?
- If Yes: This is likely the cause. It’s best to unlink the sheet and re-link it to a new tab. Do your data analysis in a separate tab that pulls from the response data.
- Question: Did you check the Responses tab in your Form to see if the link to the Sheet is still active?
- I’m using an
IMPORTRANGEformula…- Question: Do you see a
#REF!error in the cell?- If Yes: You need to hover over the cell and click the “Allow access” button to connect the two sheets.
- Question: Is the formula returning an error other than
#REF!?- If Yes: Double-check your
spreadsheet_urlandrange_stringfor typos. Remember to wrap sheet names with spaces in single quotes (e.g.,'My Data'!A1:B).
- If Yes: Double-check your
- Question: Do you see a
- I’m using Zapier or Make…
- Question: Is your Zap or Scenario turned ON?
- If No: Turn it on.
- Question: Have you checked the Task History or Run History for errors?
- If Yes: The error message will tell you what’s wrong. A common issue is permissions; you may need to reconnect your Google Sheets account. Another is mismatched data; if you changed column headers in the Sheet, you must update the mapping in your Zap.
- Question: Is your Zap or Scenario turned ON?
- I’m using AppSheet…
- Question: Did you press the “Sync” button in the app after entering data?
- If No: Sync the app to push the changes to your Sheet.
- Question: Is your device offline?
- If Yes: AppSheet will hold the data and sync it automatically once you’re back online.
- Question: Still not working?
- If Yes: In the AppSheet editor on your computer, check the Manage > Monitor > Audit History for detailed sync error logs.
- Question: Did you press the “Sync” button in the app after entering data?
Connecting to Other Platforms
While this guide focuses on Google Sheets, the same principles apply to other spreadsheet tools.
NFC tag to Excel
If your reader specifically needs NFC tag to Excel functionality, the same no-code principles still apply! You can use Zapier, Make, or IFTTT in the exact same way. Instead of choosing the Google Sheets action, you simply select the Microsoft Excel action (“Add Row to Spreadsheet”). For users in the Microsoft ecosystem, Microsoft Power Automate is a powerful alternative to Zapier with deep integration with Excel.
FAQ on How to Connect Taps to Google Sheets Without Coding
These are short, crisp answers to the most common questions.
Q: How to connect tabs in Google Sheets?
A: For tabs in the same file, use =SheetName!A1. For separate files, use =IMPORTRANGE("spreadsheet_url", "range_string") and grant access.
Q: How do I link tabs in a spreadsheet?
A: Use the source tab’s name, an exclamation mark, and the cell reference (e.g., =Totals!C5).
Q: How to connect GForm to sheets?
A: In your form’s Responses tab, click the green Sheets icon and link to a new or existing spreadsheet.
Q: Can I edit the data in the Google Sheet from a Google Form?
A: It’s not recommended. Manually editing the response sheet can break the connection. Analyze the data in a separate tab using formulas.
Q: What is a webhook?
A: A webhook is a special URL that apps can use to send automated messages or data to other apps. In this guide, it’s how an NFC tap on your phone can tell Zapier or Make to run an automation.
Q: Is there a free API connector for Google Sheets?
A: Yes. The Mixed Analytics API Connector and Coupler.io offer free plans with limitations on requests or automated refreshes.
Q: AppSheet vs Zapier for Google Sheets?
A: AppSheet is for data capture—it builds a mobile app interface on top of your Sheet. Zapier is for automation—it connects external events to your Sheet.
Conclusion: You’re Ready to Connect Your World
As we’ve seen, connecting a real-world “tap” to Google Sheets is more accessible than ever. You don’t need a background in coding to build powerful, automated workflows that save time, reduce errors, and bring your data to life.
Whether you’re starting with a simple QR code linked to a Google Form, syncing data between sheets with IMPORTRANGE, or building a full-fledged mobile app with AppSheet, the right solution is at your fingertips. The key is to start with the tool that solves your immediate problem and then explore more advanced options as your needs grow.
Now it’s your turn. Pick a project, start connecting, and watch as your spreadsheet transforms from a static document into a dynamic hub for your real-time data.
Meet Oladepo Babatunde, a technical writer and researcher who makes digital business cards easy to use in the real world. As the founder of CardAdviceHub.com, Oladepo turns tap‑to‑connect tech into clear, reliable workflows—covering NFC/QR setup, troubleshooting, platform comparisons, and practical design tips. He draws on a Higher National Diploma in Computer Science and more than a decade of writing experience since 2014 to test cards, apps, and accessories hands‑on, then share step‑by‑step guides with screenshots, checklists, and templates you can follow in minutes. When he’s not filming tutorials, he’s building resources that help solo creators and teams launch faster—no code required. CardAdviceHub focuses on informational how‑tos and does not publish financial advice.
Areas of focus: NFC tags and chips (NTAG213/215/216), iPhone/Android setup, QR best practices, platform integrations (Sheets, HubSpot, Zapier), event signage and accessories.
How I test: Real devices, repeated tap/read tests with different cases/materials, screenshots and videos for every step, and “first‑try” reliability checks.
Editorial standards: Every how‑to is reproducible, updated when apps change, and clearly labels any affiliate relationships. No financial advice.
Contact: info@cardadvicehub.com (or contact us)